
Scope Clarification (free tool)
Scope Clarification collects missing project details on one shared form. You’ll see No account needed. Subtitle: Fill in what you know and send to clients for completion.
It is not a pricing request. For per-vendor prices use Request Quote. See also Free tools overview.
Scope Clarification vs Request Quote
Section titled “Scope Clarification vs Request Quote”| Scope Clarification | Request Quote | |
|---|---|---|
| Open it | Scope Clarification | Request Quote |
| Goal | Shared details form | Per-vendor pricing |
| Invite step | Invite Clients | Add Recipients |
| Track clients/vendors card | Clients | Vendors |
| Send button | Send to clients | Send quote requests |
| Complete | Creator marks complete; whole shared form locks | Each vendor submits or declines independently |
Everyone invited to a clarification edits the same scope answers until the form is locked or finalised.
End-to-end path
Section titled “End-to-end path”Create starts from the hub Start card (or Scope Clarification). After Your details, the success screen gives you a tracking link. Fill Form, Invite Clients, and Review & Send continue on that page (same step labels as the wizard).
- Open Scope Clarification from hub Start, or back with All free tools to All free tools.
- Select Form. Pick a System templates card.
- Your details. Name, email, property address; optional required-by date. Continue creates the clarification.
- Success: You’re set (or Check your email), then Open your tracking link.
- On your tracking link: Fill Form (what you know; clients can add more later).
- Invite Clients by email (no account for them).
- Review & Send → Send to clients. Recipients open their shareable link and edit the same form.
- When details are agreed, the creator marks the form complete (locks). See Complete and lock below.
Wizard labels
Section titled “Wizard labels”| Element | Label |
|---|---|
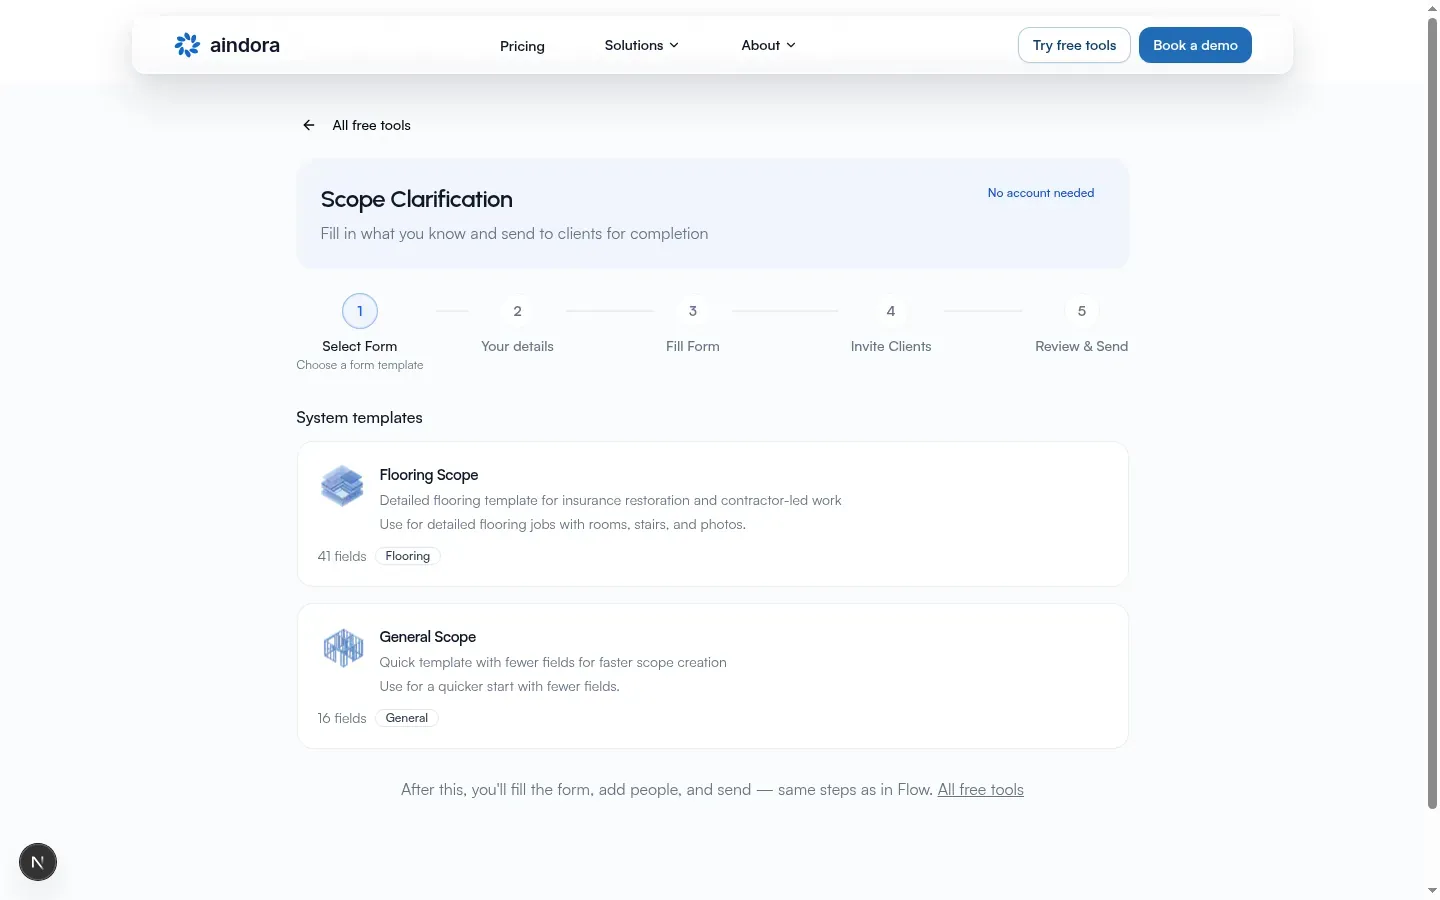
| Title | Scope Clarification |
| Subtitle | Fill in what you know and send to clients for completion |
| Badge | No account needed |
| Steps | Select Form → Your details → Fill Form → Invite Clients → Review & Send |
| Back (template step) | All free tools → All free tools |
| Back (details step) | Back (returns to template select) |
Mobile strip shows Step N of 5 with the active step title and description. Step descriptions: Choose a form template; Who you are and where the job is; Fill in what you know; Who should complete the details?; Review and send to clients.
Select Form
Section titled “Select Form”Heading: System templates. When empty: No templates available.
Known system names: Flooring Scope and General Scope.
| Template | Summary |
|---|---|
| Flooring Scope | Use for detailed flooring jobs with rooms, stairs, and photos. |
| General Scope | Use for a quicker start with fewer fields. |
Each card shows a live N fields count from the template.
Footer under the list: After this, you’ll fill the form, add people, and send (same steps as in Flow), plus link All free tools.
Your details (create)
Section titled “Your details (create)”After you pick a template, the header badge shows the selected template name.
Card: Your details
Section titled “Card: Your details”You’ll see: We’ll email you a link so you can finish and come back later.
| Field | Required |
|---|---|
| Your name | Yes |
| Your email | Yes |
Card: Project details
Section titled “Card: Project details”You’ll see: Where you need details collected.
| Field | Required | Notes |
|---|---|---|
| Property address | Yes | Example: 123 Main St |
| Required by | No | Date; help: When you need a response back |
Primary: Continue (loading: Starting…). Action-bar note links Create free account for unlimited requests.
Free limit
Section titled “Free limit”If you hit the free limit: title Free limit reached; copy that you’ve used your 5 free clarification requests; buttons Create free account / Already have an account? Log in.
Success screen
Section titled “Success screen”| Element | Copy |
|---|---|
| Title (tracking link ready) | You’re set |
| Title (no continue link) | Check your email |
| Intake description (tracking link ready) | Next: fill in the details, invite people, and send it. |
| Primary button | Open your tracking link |
| Secondary | Copy tracking link / Link copied |
| Email line | Tracking link sent to your email when provided |
| Secondary action | Start over (resets wizard) |
Your tracking link
Section titled “Your tracking link”Open your tracking link. Steps continue as Fill Form → Invite Clients → Review & Send. After send, the step strip is hidden. Back label: New clarification → Scope Clarification.
Loading: Loading your submission…. Missing/expired: Submission not found / This tracking link may be invalid or expired.
Fill Form
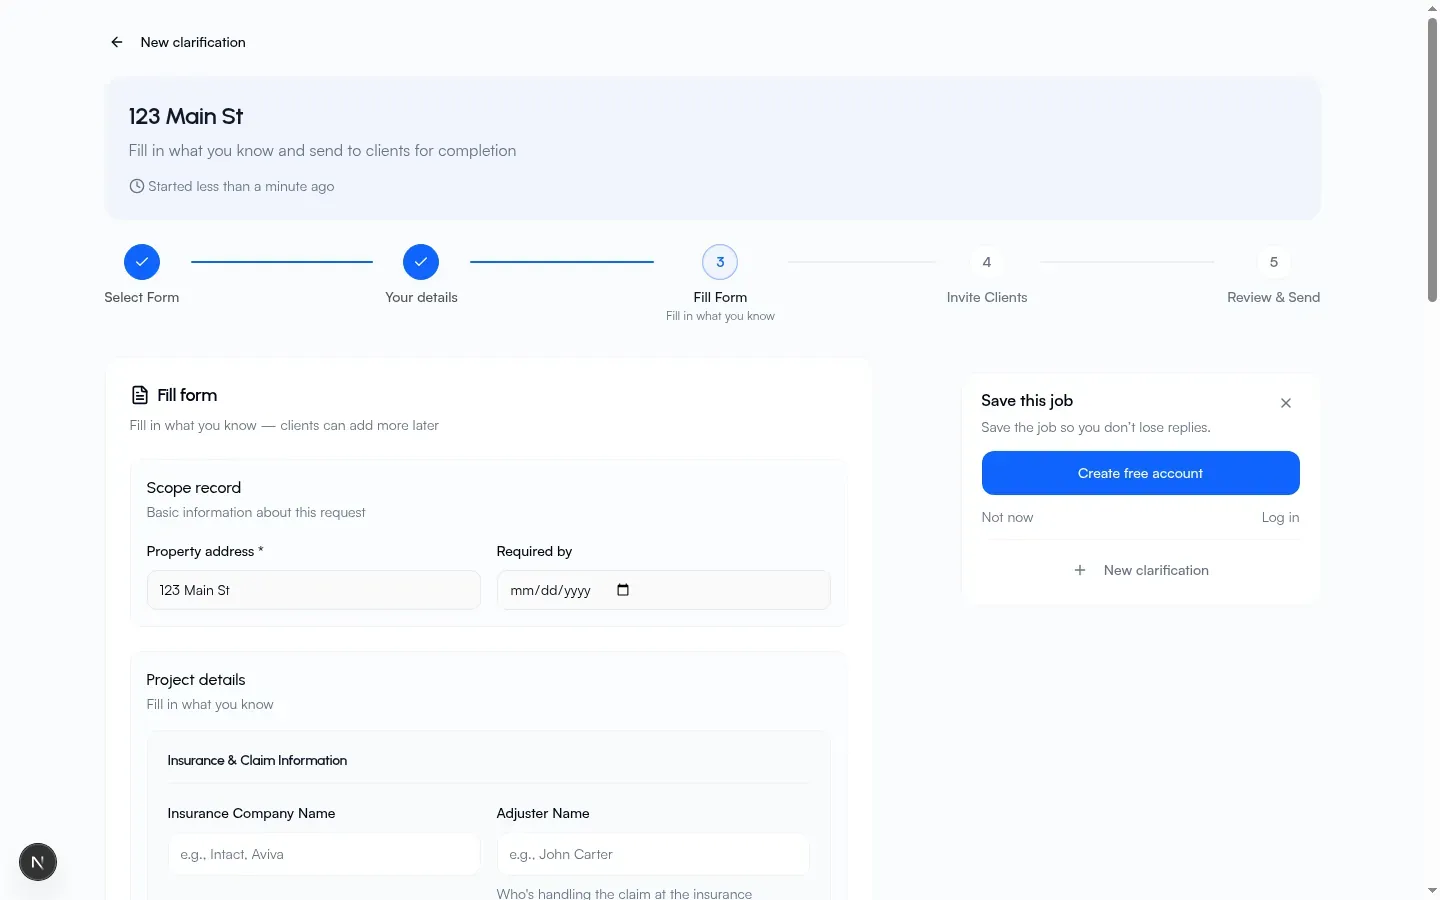
Section titled “Fill Form”Card title: Fill form. Intake description: Fill in what you know (clients can add more later).
- Editable when not locked and not complete: fill the template fields; Next saves and continues (confirmation: Form saved).
- Help under Next: Next saves your form and continues.
- When locked and you can’t edit: shows Property address / Required by and Project details (or No project details); gray note Form is locked.
Required template fields must be filled before clients unlock (messages: Incomplete form / Complete the form first).
Invite Clients
Section titled “Invite Clients”Card title: Invite clients (step label: Invite Clients). Dialog title / submit: Add clients. Pending status label: Ready to send.
Empty (unlocked): No one added yet. Tap Invite to add people. If form incomplete: Finish the form first, then add people. Amber guard: Go back and finish required form fields before adding people.
On the post-send Clients card (review):
- Empty: Nobody has this form yet / Add a client by email (they open a link, no sign-up).
- Actions: Add clients / Cancel; confirmations: Client added / Client removed.
- Description lines shift with state (for example Form complete. Add clients to continue.; Waiting for client to provide details; Form has been finalised).
Review & Send
Section titled “Review & Send”- Status badges: Started or Sent, Finalised, Form locked; opened count N of M opened when recipients exist; submitted chip N of M submitted for intake.
- Clients card (above).
- Project details card; description What clients will fill in and confirm. Edit mode: Editing (save when you’re done); actions Edit / Cancel / Save.
- When present: Property address, Required by. Empty template answers: No project details.
- Send: Send to clients (confirmation: Sent successfully / Sent to all pending recipients.). Or All invitations sent / Add clients to send. When complete: All done.
Comments and prompts to save your work sit beside the tracking page. Those buttons (Create free account, Log in, Save to an organization, Not now) are documented on the Flow free-tools page.
Shared form (core idea)
Section titled “Shared form (core idea)”Creator and every invited client edit the same scope answers (template fields plus property address and required-by date). This is details collection, not pricing.
- Creator track and recipient public link both show lock / finalised states.
- Lock freezes edits on the shared form; comments may still be allowed on the recipient link.
- Finalise (complete) marks the clarification done for everyone on that form.
Complete and lock
Section titled “Complete and lock”The tracking page shows complete/lock state:
| State | What you see |
|---|---|
| Locked (not finalised) | Badge Form locked; amber Form has been locked. No further edits can be made. plus optional Reason: |
| Finalised | Badge Finalised; card Form finalised / This form has been finalised and agreed to be worked on. |
| Editability | Form is not editable when locked or complete |
Creator Finalise form / Lock form dialogs (with reason field) are available on the Flow Scope Clarification detail page. See Scopes for those controls and for creating a project after you finalise.
Recipient link
Section titled “Recipient link”Open the shareable recipient link. Clients open the link with no account. They edit the shared form when allowed (can respond, not locked).
Status chips (intake): Details Needed, Submitted, Finalised as applicable. Locked (not finalised) copy notes no further edits; comments still allowed. Finalised title on recipient: Form Finalised (same agreed-to-be-worked-on body). Submitted-but-not-finalised: Details Submitted.
Already logged in
Section titled “Already logged in”If you open the free-tool link while signed in to Flow, you may be sent to your company’s Scope Clarification create screen, see Which company?, or stay on the no-account wizard (Continue without an account). Items you created before signing up can later be added to a company you own.
That path, picker, import (Import from free tools?), and save-the-job prompts are on Free tools in Flow.